So you’ve just got your guitar, and you’ve had your first lesson, but somehow the notes seem funny. You’re guitar has probably gone out of tune! Guitars will need tuning each time you play them! So how do you tune the guitar?
There are three main methods. You can tune using an electronic tuner, you can tune to a piano or keyboard, or you can tune one string to a reference pitch (such as a tuning fork), and tune the rest of the strings to it. The easiest method is to use an electronic guitar tuner. So we will look at that first.
Tuning with an electronic tuner
Electronic tuners which can be used for guitar come in two varieties – guitar tuners, or chromatic tuners. Guitar tuners have a setting which when activated means the tuner looks for the specific sound of one of the six strings of the guitar. These tuners may also have a setting for bass or violin, so make sure you set it to guitar! When you play a string, the tuner will match it to the closest guitar string, and tell you whether it is sharp (too high in pitch) or flat (too low in pitch). If the guitar is way out of tune, the tuner might think you are tuning a different string, so look on the screen for an indication of the string, and make sure it matches the string you are tuning. Then turn the tuning peg to make the pitch sharper or flatter as needed to centre the needle or light on the display. Then do the same for the other strings!
It helps to know the names of the strings so you can check that the tuner has picked out the right note to tune to! The thickest lowest sounding string is E, also called the 6th string. Next in pitch is the A or 5th string, then the D (4th), G(3rd), B(2nd) and finally highest in pitch the top E (1st) string. Note that there are two E strings, a low one, and a high one!
A mnemonic to remember the names of the strings (lowest to highest in pitch) is the sentence: Every Australian Dog Gets Beef Everyday. The letter begginning each word is the name of the strings in order from lowest to highest in pitch.
Chromatic tuners are a little bit harder for beginners to use, but once you know the names of the strings, they are just as easy as the others. Chromatic tuners tune to the closest note to the one sounding, whether it’s the proper note for the string or not. So if you are not careful, you could find yourself tuning your string to a C# or a Gb, and then wondering why your guitar still sounds very out of tune! The trick is to make sure you are tuning to the right note for each string. If you are tuning the G string, for example, and the tuner registers F or Gb (G flat), then you must sharpen the note (make the pitch higher) until the tuner registers a G, and then continue to tune until you centre the needle or light on the display. Use the mnemonic above if you can’t remember the names of all the strings!
Many tuners have different modes, and can operate in guitar mode, chromatic mode, or bass or violin mode – so make sure your tuner is in guitar or chromatic mode! Other problems can occur if you inadvertently change the reference frequency. Pianos and keyboards and most orchestral and band instruments are tuned to a reference frequency of 440 Hz for the pitch of A. Most tuners allow you to change this reference frequency up or down, and if this happens you will be out of tune with records, radio, pianos, keyboards etc! Make sure that the numbers 440 appear on the display, and not 445 or 436 etc! Tuners often allow you to tune flat by one or more semitones. This is often indicated by one or more flat symbols, which look a little like a script lower case ‘b’, in the display. Make sure there are no flat symbols showing when you tune your guitar, otherwise you will be out of tune with other instruments! (Though you will be in tune with yourself!)
Tuning to a piano or keyboard
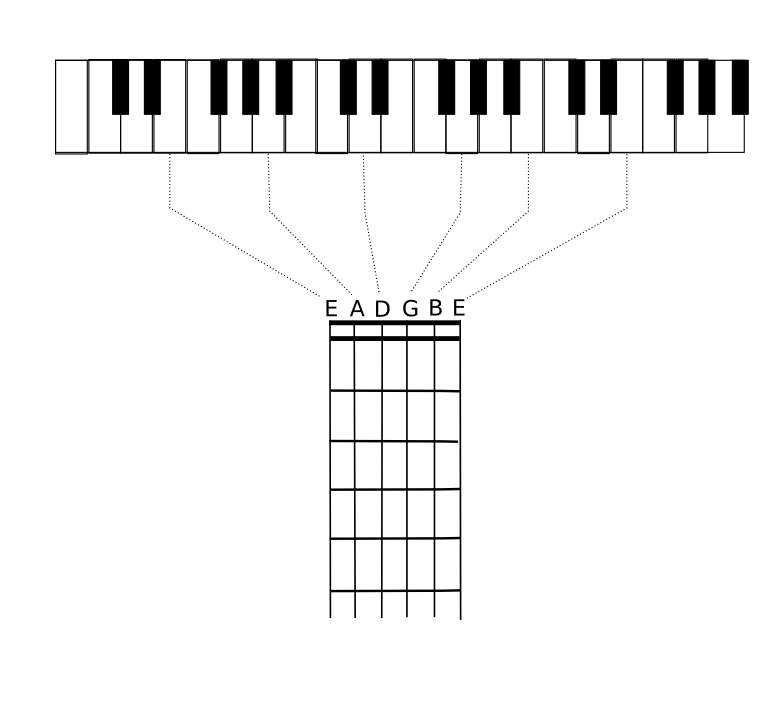
Just play the note on the keyboard that corresponds to the string of the guitar, and adjust the tuning peg until the two notes sound the same. Listen for the two notes beating against each other, making a “wah wah wah” sound. This should get slower and slower until it disappears when the two notes are in tune. If you don’t know the names of the notes on the piano keyboard, use the picture below!

Tuning with a tuning fork or other reference pitch
If you have a tuning fork for A 440, tap the tuning fork on your knee, and hold the stem of the tuning fork to the body of the guitar, where you won’t damage the finish. This will make the sound of the tuning fork much more audible. Then play the A string and tune until the pitches match. Once again listen for the beat between the out of tune notes, which sounds like “wah wah wah”, and adjust the tuning peg so this beat slows down and disappears. This is easier if you play the harmonic on the 12th fret of the A string, as the tuning fork sounds an octave higher than the string.
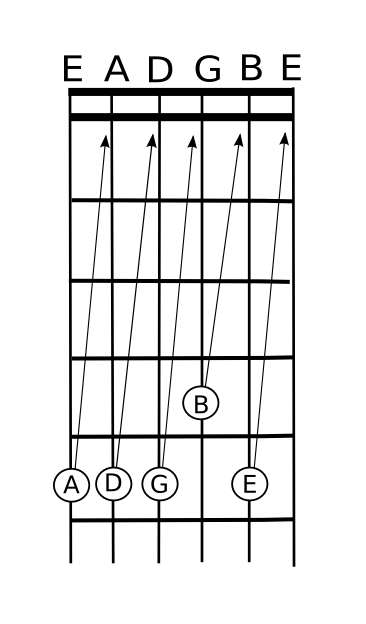
When the A string is tuned, tune the other strings to the A string, using the following diagram:
 (1) Place finger on the 5th fret of the bottom E string. Turn the tuning Peg of the bottom E string until the pitch matches that of the A string which you just tuned to the reference pitch. Listen for the “Wah Wah Wah” of the beats getting slower and slower until they stop when the two notes are in tune.
(2) Place finger on the 5th fret of the A string, which gives you a D. Turn the tuning peg of the D string until the two notes match.
(3) Place finger on the 5th fret of the D string, which gives you a G. Turn the tuning peg of the G string until the two notes match.
(4) Place finger on the 4th fret of the G string, which gives you a B. Turn the tuning peg of the B string until the two notes match.
(5) Place finger on the 5th fret of the B string, which gives you an E. Turn the tuning peg of the high E string until the two notes match.
Your guitar should now be in tune. Strum a chord, such as a G major, C major or E major. If they don’t sound right, you will need to repeat the process again, taking more care to match the notes. As this is a skill that requires practice to get right, keep persevering, and ask your teacher or a friend who plays to help you tune up. If your guitar doesn’t tune up properly, even for your teacher or an experienced player, you might need new strings. If new strings don’t help, you might need a set-up on your guitar from a luthier (ask at your local music shop), to adjust the intonation. If you have a cheap guitar, it is probably time to get a better, more expensive model!
Tuning with harmonics
Harmonics are bell like tones produced when a finger on the left hand lightly touches the string without exerting any downward pressure, at an exact location (e.g. above the 12th fret), while the string is plucked. To sound a harmonic, lightly rest your finger on the bottom E string exactly above the 12th fret, without pressing down as you normally would. Pluck the string, and immediately remove your finger. A note an octave higher than the open string should sound. Harmonics can also be found at the 7th fret, and the 5th fret, and many other positions on the neck.
To tune using harmonics, first adjust the A string using a pitch reference such as a tuning fork.

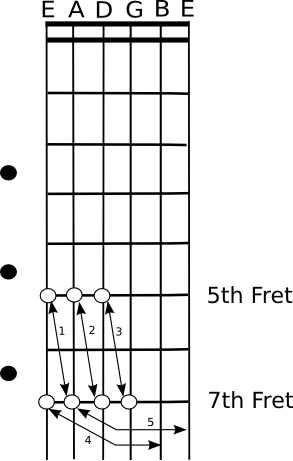
(1) Sound the harmonic on the 5th fret of the bottom E string, and at the same time sound the harmonic on the 7th fret of the A string. Adjust the tuning peg on the bottom E string until the two notes are the same. As above, you will hear the beating of the notes (the wah wah wah sound) slow down and stop when the strings are in tune.
(2) Repeat with the harmonic on the 5th fret of the A string and the 7th fret of the D string, tuning the D string until the harmonics stop beating.
(3) Repeat with the harmonic on the 5th fret of the D string and the 7th fret of the G string, tuning the G string until the harmonics stop beating.
(4) Sound the harmonic on the 7th fret of the bottom E string, and the open B string. Tune the B string until the notes stop beating.
(5) Sound the harmonic on the 7th fret of the A string, and the open top E string. Tune the top E string until the notes stop beating.
Your guitar should now be in tune!
It may take you several attempts to get your guitar in tune, but persevere. It is a skill that improves with practice!


